[ Python ] FlaskとSQLAlchemyでDBと連携したフォームバリデーションを実装してみた
前回の記事でデータベースに繋がったFlaskアプリケーションを作成しました。今回はフォームの値をバリデーションする機能を付けてみようと思います。
ディレクトリ構成
以下の構成で作成していきます。
前回の構成をそのまま使います。
※現時点では新規作成画面の実装のみご紹介します。
$ tree
.
├── crud.py
├── database.py
├── custom_forms.py
├── validator.py
└── templates
    ├── base.html
    ├── index.html
    └── update.html

1 directory, 7 files
必要なライブラリ
バリデーションに必要な機能の入ったライブラリ「WTForms」をインストールします。
$ pip install WTForms
テーブル定義を前回から少し変更してみる
新たに入力フィールドを追加したいので、前回の「database.py」に少し手を加えます。
修正後、ターミナル上から「python database.py」でテーブルを再作成しましょう。
- database.py
#!/home/<user_name>/.virtualenvs/web1/bin/python

import sys
from sqlalchemy import *
from sqlalchemy.orm import *
from sqlalchemy.sql.functions import current_timestamp
from sqlalchemy.ext.declarative import declarative_base
from sqlalchemy import Column, Integer, String, TIMESTAMP

DATABASE = 'mysql://%s:%s@%s/%s?charset=utf8mb4' % (
    "docker",  #ユーザー「docker」の
    "docker",  #パスワード「docker」で
    "127.0.0.1:3306",  #MySQLサーバ(http:\/\/127.0.0.1:3306)に接続し
    "test_db", #データベース「test_db」にアクセスします
)

#DB接続用のインスタンスを作成
ENGINE = create_engine(
    DATABASE,
    convert_unicode=True,
    echo=True  #SQLをログに吐き出すフラグ
)

#上記のインスタンスを使って、MySQLとのセッションを張ります
session = scoped_session(
    sessionmaker(
        autoflush = False,
        autocommit = False,
        bind = ENGINE,
    )
)

#以下に書いていくDBモデルのベース部分を作ります
Base = declarative_base()
Base.query = session.query_property()

#DBとデータをやり取りするためのモデルを定義
class User(Base):
    __tablename__ = 'users'
    id = Column('id', Integer, primary_key = True)
    name = Column('name', String(200))
    age = Column('age', Integer)
    description = Column('description', TEXT)
    topics = Column('topics', TEXT)
    created_at = Column('created_at', TIMESTAMP, server_default=current_timestamp())
    updated_at = Column('updated_at', TIMESTAMP, nullable=False, server_default=text('CURRENT_TIMESTAMP ON UPDATE CURRENT_TIMESTAMP'))

#このPythonスクリプトを実行したとき、テーブルを一旦削除して新規作成する
def main(args):
    Base.metadata.drop_all(bind=ENGINE)
    Base.metadata.create_all(bind=ENGINE)

#このファイルを直接実行したとき、mainメソッドでテーブルを作成する
if __name__ == "__main__":
    main(sys.argv)
「input type=“number”」生成クラスを作成
筆者の環境が十分ではなかったのかもしれないですが、wtforms.widgetsの一覧に「NumberInput」がありませんでした。
Python 3.5.6 (default, Sep 28 2019, 10:29:54)
[GCC 7.4.0] on linux
Type "help", "copyright", "credits" or "license" for more information.
>>> from wtforms import widgets
>>> dir(widgets)
['CheckboxInput', 'FileInput', 'HTMLString', 'HiddenInput', 'Input', 'ListWidget', 'Option', 'PasswordInput', 'RadioInput', 'Select', 'SubmitInput', 'TableWidget', 'TextArea', 'TextInput', '__builtins__', '__cached__', '__doc__', '__file__', '__loader__', '__name__', '__package__', '__path__', '__spec__', 'core', 'html_params']
なので公式ソースを調べて参考にし、既存のInputクラスを継承して「NumberInput」クラスを作成しました。。(汗)
- custom_forms.py
from wtforms.widgets import Input

class NumberInput(Input):
    input_type = "number"
    validation_attrs = ["required", "max", "min", "step"]

    def __init__(self, step=None, min=None, max=None):
        self.step = step
        self.min = min
        self.max = max

    def __call__(self, field, **kwargs):
        if self.step is not None:
            kwargs.setdefault("step", self.step)
        if self.min is not None:
            kwargs.setdefault("min", self.min)
        if self.max is not None:
            kwargs.setdefault("max", self.max)
        return super().__call__(field, **kwargs)
バリデーションロジックの作成
既存のDBモデル(database.pyに作成した「Userクラス」)に合わせるように、フォームクラスを作成し、ルールも合わせて定義していきます。
- validator.py
from flask_wtf import FlaskForm
from wtforms import validators, StringField, IntegerField, validators, TextAreaField, ValidationError
from custom_forms import *

class UserForm(FlaskForm):
    message_required = "必須項目です"
    name = StringField("名前")
    age = IntegerField('年齢', widget=NumberInput(),  validators=[validators.InputRequired(message_required)])
    description = TextAreaField("自己紹介")
    topics = StringField("気になるトピック (カンマ区切りで入力してください。)")

    def validate_name(self, name):
        if name.data == "":
            raise ValidationError("名前を入力してください")

    def validate_age(self, age):
        if age.data == "":
            raise ValidationError("年齢を入力してください")

    def validate_description(self, description):
        if description.data == "":
            raise ValidationError("本文を入力してください。")

        if len(description.data) < 10:
            raise ValidationError("本文は10文字以上にしてください。")

    def validate_topics(self, topics):
        topic_list = topics.data.strip().split(",")
        if len(topic_list) < 3:
            raise ValidationError("好きなトピックを少なくとも3つ教えてください。")
各フィールドクラスの引数には
- 引数1: ラベル名
- 引数widget(年齢のみ): テンプレート側で数値入力のフォームを生成するよう指定
- 引数validators: 公式定義済みのバリデータ or 自前のバリデータ
を指定できます。
下部のメソッドで詳しく入力値の検証ルールを定義できます。
公式サイトではバリデーションルールの命名規則が「validate_<カラム名>」のようなので、それに従って定義してみます。
メインプログラムの修正
フォームクラスを作成したので、メイン処理から呼び出せるようにします。
今回は新規作成フォームのみバリデーションしています。
※DBテーブルの構造を変更したので、エラーにならないようupdate()も修正しています。
- server.py
from flask import Flask, render_template, request, redirect, url_for
from flask_wtf.csrf import CSRFProtect
import os
from database import *
from validator import *
#import datetime


app = Flask(__name__)
app.config['SECRET_KEY'] = os.urandom(24) #セッション情報を暗号化するための設定
csrf = CSRFProtect(app)

@app.route('/', methods=['GET'])
def index():
    title = "ユーザー一覧"
    form = UserForm()
    names = session.query(User).order_by(desc(User.updated_at)).all()
    return render_template('index.html', names=names, form=form, title=title)


@app.route('/', methods=['POST'])
def insert():
    form = UserForm()
    if form.validate_on_submit():
        try:
            user = User()
            user.id = 0
            user.age = request.form.get('age', None)
            user.name = request.form.get('name', None)
            user.description = request.form.get('description', None)
            user.topics = request.form.get('topics', None)
            session.add(user)
            session.flush()
            session.commit()
            return redirect(url_for('index'))
        except Exception as e:
            return redirect(url_for('index'))
    else:
        title = "ユーザー一覧"
        names = session.query(User).order_by(desc(User.updated_at)).all()
        return render_template('index.html', names=names, form=form, title=title)

@app.route('/<int:id>', methods=['GET'])
def edit(id):
    try:
        title = '編集画面'
        name = User.query.filter(User.id == id).one()
        return render_template('update.html', name=name, title=title)
    except Exception as e:
        return redirect(url_for('index'))

@app.route('/<int:id>/update', methods=['POST'])
def update(id):
    try:
        if request.form.get('_method', '') == 'PUT':
            user = User.query.filter(User.id == id).one()
            user.age = request.form.get('age', None)
            user.name = request.form.get('name', None)
            user.description = request.form.get('description', None)
            user.topics = request.form.get('topics', None)
            session.commit()
            return redirect(url_for('one_user', id=int(id)))
        else:
            return redirect(url_for('index'))
    except Exception as e:
        print("Failed to update user")
        print(e)
        return redirect(url_for('index'))

@app.route('/delete', methods=['POST'])
def delete():
    try:
        if request.form.get('_method', '') == 'DELETE':
            id = request.form['id']
            user = User.query.filter(User.id == id).one()
            session.delete(user)
            session.commit()
        return redirect(url_for('index'))
    except Exception as e:
        return redirect(url_for('index'))

if __name__=="__main__":
    app.debug = True
    app.run(host='0.0.0.0', port="8888")
新規作成画面をバリデーションに対応
前回作成した「templates/index.html」を以下のように修正していきます。
- templates/index.html
<!--ベースのHTML(base.html)の
    block content宣言した部分に
    このHTMLがはめ込まれて出力される-->
    {% extends "base.html" %}
{% block content %}
<h2>ユーザー登録フォーム</h2>
<form style="line-height: 14px;" action="/" method="POST">
    {{ form.hidden_tag() }}
    <div style="margin-bottom: 14px">
    {{ form.name.label }}:
    {{ form.name(placeholder="名前を入力") }}
    {% for error in form.name.errors %}
        <span style="color: red;">{{ error }}</span>
    {% endfor %}
    </div>
    <div style="margin-bottom: 14px">
    {{ form.age.label }}:
    {{ form.age(placeholder="12") }}
    {% for error in form.age.errors %}
        <span style="color: red;">{{ error }}</span>
    {% endfor %}
    </div>
    <div style="margin-bottom: 14px">
    {{ form.description.label }}:
    {{ form.description(placeholder="自己紹介を入力") }}
    {% for error in form.description.errors %}
        <span style="color: red;">{{ error }}</span>
    {% endfor %}
    </div>
    <div style="margin-bottom: 14px">
    {{ form.topics.label }}:
    {{ form.topics(placeholder="アウトドア,手芸") }}
    {% for error in form.topics.errors %}
        <span style="color: red;">{{ error }}</span>
    {% endfor %}
    </div>
    <div>
        <button type="submit">新規登録</button>
    </div>
</form>
<h2>{{ title }}</h2>
{% for name in names %}
<div style="line-height: 12px;">
    <p>ID: {{ name.id }}</p>
    <p>名前: {{ name.name }}</p>
    <p>年齢: {{ name.age }}</p>
    <p>自己紹介: {{ name.description }}</p>
    <p>お気に入りトピック: {{ name.topics }}</p>
    <p>登録日時: {{ name.created_at }}</p>
    <p>更新日時: {{ name.updated_at }}</p>
</div>
<div style="margin-bottom: 40px;">
    <a href="/{{ name.id }}"><button type="button">編集</button></a>
    <form action="/delete" method="POST">
        <input type="hidden" name="csrf_token" value="{{ csrf_token() }}"/>
        <input type="hidden" name="_method" value="DELETE"/>
        <input type="hidden" name="id" value="{{ name.id }}">
        <button type="submit">削除</button>
    </form>
</div>
{% endfor %}
{% endblock %}
バリデーションを実装していますが、ここでcsrf_tokenを含めてないとフォームがうまく動かないようなので、忘れず付けましょう。
ちなみにinput部分の生成結果は
{{ form.age(placeholder="12") }}
から
<input id="age" name="age" placeholder="12" required="" type="number" value="12"> <!--"12"の部分はold値 or 空の値-->
が生成されるようです。
アプリケーションを動かしてみる
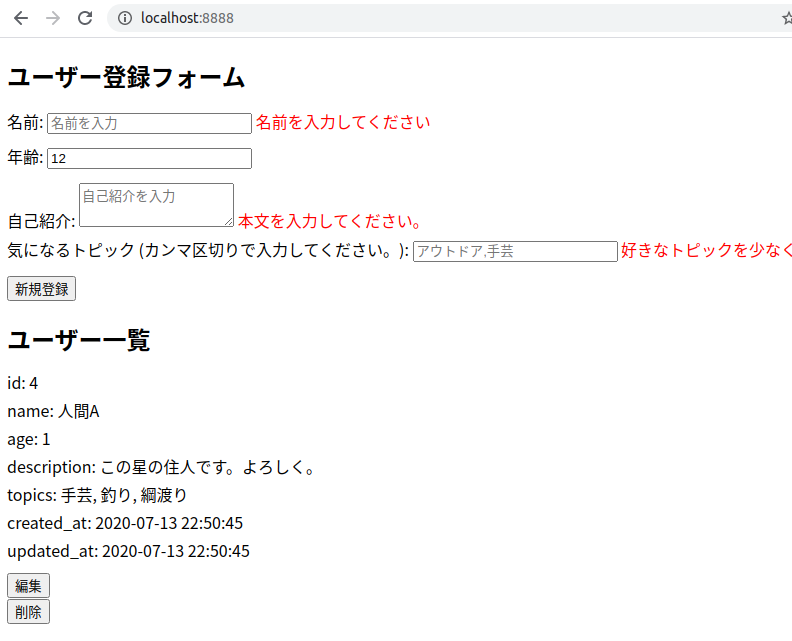
今回は時間の都合で新規作成画面のみですが、動かしてみましょう。
$ python server.py

このようにエラーは拾って、OKのデータは保存されました!
最後に
フォームからデータベースと値のやり取りをし、値のバリデーションまで行くと、更にできることの幅が広がってきました。
次回以降、ログイン機能も付けてみたいですね。
ではこのあたりで!